GetSign is a powerful tool that enables you to easily create, send, sign and track eDigital Signatures using your monday.com boards. Whether you need to create purchase orders, price quotes, contracts or agreements, GetSign has you covered. Here’s a step-by-step guide on how to install and use GetSign:
Step 1 – Installing GetSign
- Go to the monday.com App marketplace and search for “GetSign”.
- Click on the “Add to your account” button.
- Follow the authorization process to install the app.
- Once installed, navigate to the board where you want to use GetSign.
- Click on any existing item or create a new item.
- Click on the “+” button to add a view and select GetSign.
Step 2 – Create the necessary columns
- Navigate to the board view and click on the “+” button to create new columns for your board. Consider adding columns for “status,” “email,” and “files.”
Reminder:
At the start, default statuses are available. As you move along the different stages of signing, different statuses will be loaded. A full list of statuses will be fully loaded once you complete the signing process.
Step 3 – Uploading a document
This article offers three different workflows for you to select from. You can explore each workflow’s functionality by clicking on the provided link for more details.
- Click on the “Start here” button in the item view.
- Upload the document (agreements or contracts) you need to sign.
👉 Selecting a workflow

Three Workflows
- Create Templates + Sign Documents: This allows you create a predefine template that you can send regularly for all the items in your board where you can add integration to send document for esign automatically. ✅ Supported by GetSign Autosend automation.
- Sign Documents: Allows you to send different document template every time you send. Incase you need to send different document for each item in your board you can use this flow. ⚠️ This workflow is not currently supported with Autosend automation.
- Create Templates + Generate Documents: This document template allows you to gather and generate data from your board and save them on your board column. You can use auto-generate pdf integration and generate the document automatically. ✅ Supports GetSign Auto-generate pdf
⚠️ This workflow is not currently supported with Autosend automation.

👉 Multiple Documents
You have the option to attach multiple documents per item and send them collectively. Each document can be distinct, with customized placeholders.
However, it’s important to note that if you send multiple documents and your client declines even one, the entire set of signed documents will be declined. All documents must be signed to complete the process.
- To begin, just click the “New Template” button, then proceed to upload your document.
- Select the “pencil” icon to edit the document or the trash icon to delete the uploaded file.

Step 4 – Mapping of board columns
- Go to the item view and select the “GetSign” tab.
- On the “GetSign” tab, you will see a list of columns. You can map each column to the corresponding board column you created in Step 1.
- Once you have mapped all the columns, click the “Save” button to save your changes.

Step 5 – Customizing Outgoing Emails

- Sender Name: Provide the sender’s name.
- Email Address: Enter the sender’s email address.
- Email Subject: Input the subject of the email.
- Message: Include your personalized message to the recipient.
- Logo: Upload your company logo for email branding purposes.
- Email Language: Choose the preferred language.
- OTP: Activate this option to ensure secure document delivery.
Step 6 – Verify your email
- Prior to sending your documents, it’s essential to verify your email address to prevent your emails from being flagged as spam.

- Next, head to your email inbox and complete the email verification process.

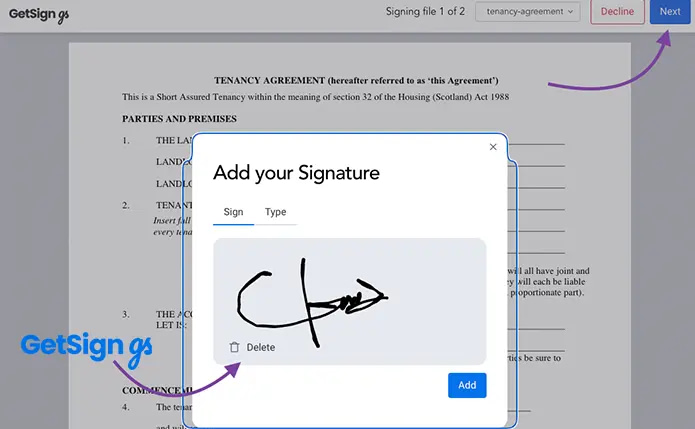
Step 7 – Add signature fields
- To modify the document and allocate signature fields in the GetSign “Item View” tab, click on the “Settings” button.
- Utilize the “pencil” icon for document editing. Drag the “Signature” field to position a signature
- Select the email column created in Step 2 to assign it to the signature field. If you skip this step, you won’t be able to send your document.
⚠️Reminder: Make sure that the email column in your board contains specified email addresses and is not empty; otherwise, the email will not be sent.

To access multiple documents, you can switch between them by clicking the dropdown menu in the top navigation.

Step 8 – Signing and sending document
- You can click on “Sign” if you want to sign the document if it’s necessary.
- Alternatively, you can send the document to the receiver.
⚠️Note that the receiver email is defined in the email column of the board. - Once the receiver views and signs the document, the board and item view status will be updated in real time.
- Preview: Enables you to view the document.
- Copy Link: Permits you to share a link with the signer for direct document signing.
- Download: Grants you the ability to download the completed document.
- Send: Enables you to dispatch the document to the recipient.

👉 Document Signing

👉 Signed Document

Step 9 – Automation
Multiple automations can be configured using GetSign.
When status changes to [***] send GetSign document for eSign
Thus, when the status column transitions to [your specified status], the automation will trigger, and the document will be sent automatically.
This feature only works if you are using

Change status to generate PDF
This automation will generate and collect signatures from your monday.com board.
⚠️This feature only supports the Create Templates + Generate Documents workflow.

- Install the GetSign automation from the Automation Center and locate “Change status to generate PDF.”
- Proceed by selecting “Create Templates + Generate Documents” and uploading a document.
- Return to the Automation Center to modify the newly added automation.
- Next, choose the template created in the second step and click on the “Add to Board” button.

Other monday.com Automation based on statuses
One of the great features of GetSign is that it updates the status of the signing process in real time. The status is updated automatically as soon as the receiver views and signs the document. You can take advantage of this feature by using monday.com automation based on the statuses. Here’s how:
Notify when the document has been signed
- Go to the board where you have set up GetSign.
- Click on the automation button in the screen’s upper-right corner.
- Click on “Create automation” and select “When the status changes to…”.
Choose the status for the trigger
- Select the status that reflects when the document has been signed by the receiver.
- Click “Add action” and select “Notify someone”.
Select the person to notify
- Choose the person or people who should be notified when the document is signed.
- Customize the message that they will receive.
Notify when the signing process is completed
- Follow the same steps as above, but choose the status that reflects when the signing process is completed.
- Select the person or people who should be notified when the process is completed.
- Customize the message that they will receive.
With these automations, you can further streamline your document workflows. You’ll be able to keep everyone in the loop and ensure that documents are signed and processed quickly and efficiently.

GetSign is a user-friendly eDigital Signature tool that allows you to manage your document workflows effortlessly on monday.com. Try it out today and see how it can help streamline your business processes.


